Tuesday 29 March 2016

Let there be cladding!

Starting to do more and more things I'm uncomfortable with now. One of them is working with wood! I vaguely remember some of woodwork at school but since then I have literally done nothing.
So I am winging it and so far I'm actually quite pleased with how I've got on.

Today's job was to remove the props for the window and start attempting some cladding.

I'd already measured and cut some of the cladding but I had many small obstacles to overcome.

The first task was to start fitting the Celotex between the battens:


This was all well and good but the battens weren't quite deep enough for the cladding to line up perfectly with the actual van wall. This meant I needed to add another frame on top. This in turn would mean the gap between the cladding and the celotex would be even greater. This would mean the cladding would have a fair bit of give.


I fitted some more batten around the frame so it matched perfectly with the van wall. I also decided to fill the gaps with thick folded cardboard. This stops any give in the cladding and also means I can remove it if I need to fit any sockets or anything else.

With the frame up, I made a start on the cladding, first starting off with the ones I'd already cut:


I made the right side up to the same height but then realised I'd made a slight miscalculation. The cladding was supposed to start at the top, leaving a couple of centimetres overlap on the window. This overlap will hold the curtain wire/rail, as I want it hidden so the curtain is within the frame.
I therefore had to adapt the next bit of cladding by cutting it with a jigsaw.

Here's the top of the window being made:


Once I had that in place, I fit the last couple of pieces and hey presto! I am seriously chuffed with the outcome. I need to go over it with a sander and obviously varnish it but for now I'm happy! Where the cladding ends, the kitchen will start. This will have a ply wall behind it hence no cladding here. I was thinking of tiling on top of the ply also.


Monday 28 March 2016

OoOoOooo Ahhhh Mother should I build the walls.......

So with a nice long bank holiday weekend I thought I'd manage to get plenty done.
Well the weather had other ideas, so basically I've only managed to get a couple of days in (including today).

I managed to sort a bit of the floor which had a bit too much give. I basically put a thinner bit of ply underneath it and then screwed the whole thing to the metal floor, making sure not to hit anything important underneath!

Then I moved onto the ply part of the walls.
I measured where I wanted these coming up to by using the height of the bed + cushions etc. You should be able to see any of the ply once everything is in. The only time you will is when the seats are turned into the bed (moving the side cushions).

Anyway, I nipped to the wood yard and got some 6mm thick ply cut to what I needed and also one extra whole piece to cut the wall part behind the drivers side later on.
I spent quite some time measuring and measuring again and drawing exactly where all the cuts needed to be made. The wheel arches where a right pain in the arse!

Once I had everything cut, I screwed it all in using self drilling metal screws. I had to figure out where the screws would go before the ply was up, this was due to most of the wall being insulation rather than metal. So in order for it to actually stay in place, I needed to find the metal parts!

Here's the outcome:


The holes you see on the drivers side wall are for the Mains Hook-up consumer unit (rear) and the water heater (front). These will need holes cutting in the side of the van!

I then managed to get some of the cladding put above the ply, this again was awkward due to having to find the metal to screw into. I had to use the self drilling screws which I may end up changing because I don't like how they stick out from the cladding, even though I countersunk the washers.
No pictures of this bit but you can see it in the pic coming up.

Today, I started fitting the internal window frames. I had to nip to screwfix and wickes to get some extra battens and black sikaflex so you wouldn't see it through the window. I had to cut all the battens to size, to use them as props whilst the sealant dried.
I then went around the entire window trim and metal frame with Sikaflex and put the frame in.

Climbing out of the van was like something off Crystal maze! I was half expecting Richard O'Brien to shake my hand when I actually got out!! It's currently outside curing (fingers crossed) so we will see if it holds once dried!


Tuesday 22 March 2016

Framing the inside windows

So.. been busy this evening!

I wanted bonded windows as I like the look of the flush big windows from the outside. However, these windows seem massive from the inside and because of my layout, some of the window will be blocked anyway. I therefore needed a way of creating an inside frame to the size of window I wanted.

Now several things had to be thought of before doing this.

  1. Although the windows are privacy, when there's a light on inside or when close up, you can see everything inside. Therefore, if I'm planning on blocking part of the window, you will see the wood from the outside and it will look poo! I looked online and found some Matt black sign vinyl which can stick directly to most things and will just look completely black from the outside.
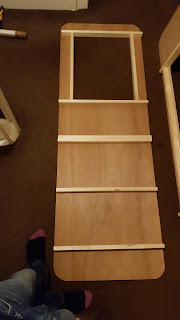
  2. I need a way of blocking the window but creating an inside frame. I chose to use a bit of ply cut exactly to the window dimensions and then a smaller window cut out of it.
  3. Once the ply would be in place, I would need to pack the window out until it sits flush with the internal walls. I am going to use battens attached to the ply and fill the gaps with insulation.
  4. The window will then need to be framed. My plan is to use cladding to frame the entire thing. The fact the window will be packed out means there should be a bit of a shelf too.
So.. When I got the floor ply cut, I also got the window ply cut to square (after measuring several times). I then used cardboard as a template to mark and cut the rounded corners.

Next was to mark where the windows would go and where the battens would go. Taking into account the spacing of the cladding shouldn't be too much or it will flex.

Once marked out, I drilled small pre holes into the ply and then countersunk the holes from the other side. The next bit was bloody awkward!! Because I needed to screw from the window side into the batten, I had to line the batten up, hold it into place and get under the ply and screw it in!! It really wasn't ideal but I got it done.

With all battens screwed into place, I cut and stuck all the vinyl to the ply, leaving a gape around the edge to glue the ply to the window trim/surround.

Pictures:
Windows as the are, you can see the taper to the van wall, awkward!


Back of window frames (facing into the van)

Passenger Side                             Drivers side

Front of window frames (facing actual window)

Passenger Side                            Drivers side

Vinyl added


Monday 21 March 2016

Flooring + Rooflight

Well after a bout of man flu, which slowed me down somewhat, I finally managed to get a few things done this week.

Firstly, I removed the second siren and the two rear floodlights as I wont be using them.

I got the floor ply cut and screwed it into place for now. I need to redo it slightly due to a bit to much give in certain places. I will also glue it down when I redo it. Used 12mm ply for the floor as it's pretty thick and sturdy. The give in places is to do with support underneath rather than the ply itself.

Didn't get many pictures of fitting the floor or anything but Kim managed to get a few:


Will get a picture of the floor fully done, when I've properly glued it all etc.

Rooflight

What a ballache of a job this turned out to be!! Basically, these rooflights are designed to plonk into a pre-cut hole and then the inside screws to the outside and seals the top to the van roof.
The one problem with this is that it needs a fully flat surface. This is rather hard on a van roof due to all the ribs that run down!

I started off by making a cardboard cut-out 400mm x 400mm and drew round this exactly where I wanted the rooflight to go (on the inside). I then drilled 4 big holes in each corner (big enough to fit the jigsaw blade through). 
Then got on top of the roof, re-drew the square using the holes as a reference. 
Once I was happy with the square after measuring about 10 times, I got the jigsaw out!
Was seriously awkward trying to cut whilst distributing my weight evenly across the roof! Kept getting cramp in my legs which isn't at all helpful when holding a jigsaw.
Anyway, eventually got it cut out and then filed down the edges as I hadn't cut particularly straight!!
Once it was all filed, painted the edges with metal paint. 

I then had to stick the internal support frame (which I had cut previously) to the van roof. This needed to be held in place with clamps until the sealant had gone off. 
As it had taken me ages to get everything cut etc, it was getting late, so had to leave it like this overnight and start again the next day.

Once the internal frame was on, I had to figure out how to make the surface on top match the height of the ribs. A lot of people use Upvc to the same thickness and pack it out around the hole (to make it level). However, where I had placed my rooflight, there was literally one rib and that's it. So I attempted to flatten the end bit with a hammer and then a G clamp. It came down quite a bit but not flat! I therefore just winged it and used a load of mastic tape to build up the height around the hole. I then place some mastic tape on the bottom of the rooflight, plonked it in the hole and screwed the inside bit to it. I went round and checked it was all sealed on the outside and that is how I've left it for now. Need to go out and re-seal round all of it tomorrow. 

Here's some action shots:


Sunday 6 March 2016

More insulation!!

Well, I've been a very busy boy this week. Managed to put in 3 hours each night and then poor Kim has got tonsillitis, so has been in bed at home all weekend. This meant I had no excuse to not work on the van all weekend. So I did!

Starting to move quickly now, at the beginning of the week I bought some cladding battens from wickes. I cut these to fit along side the roof ribs. These will be used to screw the cladding into for the ceiling. The ribs are slightly bent, so I cut some slats in the battens at equal points, so the wood would bend easier. They were then screwed into the ribs with self drilling metal screws:


Once I had all the battens up and screwed into place, I cut more celotex to fit in between. This was then glued to the roof with stixall and held in place by my makeshift wooden props!


I continued along the ceiling until I had reached the front. I then went back and cut a gap where the rooflight will go and also where the spinning vent is. I plan to keep this in and use it as an extractor fan for the kitchen when needed.


I then started insulating the curved sides to join up with the roof celotex. These were a bit of a pain but managed it with a little trick. Basically partly cut the celotex enough to snap it but keeping the aluminium front in one piece. This meant it could go round corners! Most of this stuck on well without much pressure. But a couple of them needed re-enforcing, so again, I made a makeshift prop with some wood!


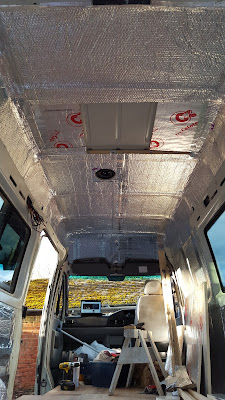
So that's where I got to in the week. All the celotex in, which is a big milestone cause that stuff takes ages. Anyway, I had decided I wanted to create a batter vapour barrier, so this weekend I nipped and got some more double backed foil bubblewrap. I was going to put this everywhere! I started with the ceiling and gluing it as I went along. This was the one time I needed a bit of help, as everything I've done so far has been a one man job. So I drafted my dad in to help me hold the foil as I glued as it was awkward. Anyway, I'm really pleased with how it all turned out, still have a little to do but here it is so far:


As you can see, I've left a gap for the rooflight, so will wait until that's in before I bubblewrap this section. I went round and stuck aluminium tape on all of the joins to seal everything up.

Finished that at about 6pm tonight but wasn't happy with going inside early, so decided to make a start cladding the side door!


I cut the cladding to size by hand and drilled them into the door with self drilling screws. I had to countersink the holes slightly as the screw heads need to pass by the side of the van when the door opens! I am very, very happy with the outcome so far. 

I'm going to continue doing this tomorrow night!

Watch this space!