Friday 29 July 2016

Where to put my guitar!?!

I had initially planned to store my guitar above the cab. However, having built the shelf and the front, there's no way my guitar is fitting in there! So, I decided to build a special cupboard for it!
I also managed to put in two floating pantry cupboards too!
The problem with this was that there was nothing to support the cupboards. I first made the front frame having meticulously measured that my guitar would fit. Then went about figuring out how to support everything. I couldn't attach to the back wall as there is just ply and insulation there. Also, I couldn't have the back of the cupboards as the back wall because of the electrics and fridge ventilation.
So, I created to braces by using angle brackets and attached them to the battens of each side wall. 
I then screwed the back of the cupboard and corner section to these braces.


I also attached the shelf runners to the side wall. I then needed to fit and screw the front in. This was slightly tricky but managed to get it all in place.


You can see the cupboard wall, loose, in the above pic. This was attached to the two corner sections and then the shelves were fit. 
I then went about making the doors for the floating cupboards:


Friday 22 July 2016

Electrics and stuff

Hi All,

Really been cracking on with stuff and haven't really got time to be writing blogs, so here's the pictures of work completed recently:

Plyed the back corner panels and installed the speakers:


Installed the fan and switch:


Plug socket (for Kims hairdryer):


Kitchen fuse box:


Shelf and backing in kitchen cupboard:


Main Fuse box and cabling:


LCD screen for rear view cameras:


Saturday 16 July 2016

Friday 15 July 2016

Shower tray and step

Managed to get the shower tray fitted in place today. I cut a load of small legs to sit under the wood that I'd already put round it and then screwed them in. I still needed to fix it to the floor somehow though, so on the door side I fitted some longer battens that screwed into the would but stuck out far enough to also screw into the floor. I sealed the rubber ring that goes under the outlet before putting the tray in place.

Once the tray was in (I had to unfit and refit the toilet to do this... urgh..) I made a start on thinking how I could make a step that meant the door and shower curtain were higher than the tray. Here's what I came up with:

I cut four large bits of wood so they were taller than the tray when sat on the floor battens. I then cut a 45 degree angle on them from half way on the top. This was to make sure water ran into the tray. They were then screwed to the shower tray battens:


Next was the front frame. Really I should have done this when building the actual front frame but I didn't know what I was going to do at that stage! I basically built up a bridge type structure. A long batten going across with 4 supporting posts, made to the same height as the large bits. These were all butt joints and I then screwed it into the front frame from the side:


I then cut a piece of 12mm ply to fit on top and also go round the corners perfectly, in order to be able to seal it all. This was then screwed into the front and the flat part of the large bits:


The next bit was fiddly. I had to cut another piece of ply to fit the 45 degree part, the problem was, here it met with the other piece. This had to be cut with a jigsaw set at 45 degrees. I did the first cut and then realised I also had to cut the opposite side in order for it to sit flat against the other piece.
Got it done eventually and screwed it into place:


Tomorrow I will fit a piece of ply to the front frame and also cover the step with the same vinyl as in the bathroom. Then, hopefully, I'll get the door in!!


Wednesday 13 July 2016

Bits and bobs

Time to really crack on now. Haven't got anything else to focus on, so all time is spent getting Reg done!
Here's what I've done in the past couple of days:

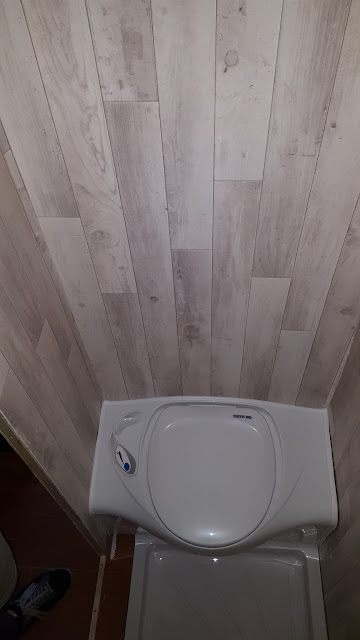
 Added final piece of vinyl flooring to bathroom wall and fitted toilet


Made front for "poo door"


Starter some of the carpeting


Made the over cab shelf


This was a bit of a pain as I had to fit the headliner back in first and cut holes for the battens. Only the battens then wouldn't fit across once the headliner was in! So had to cut them in half and fix them back together again. Then attach the shelf!! Annoying.

Started on bathroom floor and shower outlet


This was extremely annoying! The shower tray can only fit one way and the outlet was right above a chassis member underneath. This meant I couldn't just drill straight down. So I had to think of a way round it. I created a false floor and fit an angled outlet, therefore I could then put the hold in the floor away from the chassis member (See first pic). Once I'd cut the hole and fitted the outlet, I cut and fit battens for the false floor, then fit 12 inch ply over it. Oh, you may spot my mistake! I cut the hole in the wrong place at first haha. No idea how but decided I could still use the piece anyway.

Waste fittings

I decided to get both of the waste outlets sorted. So I first fit the shower pipe to the waste tank. This was simple, as I'd positioned the hole very close to the tank. So just used cable ties to secure it in place. The sink waste outlet was slightly harder. I first attached the fitting and then drilled a big enough hole in the wheel arch for the pipe to fit through. This would then need to go across the under side of the van and to the waste tank. Once the hole was cut I threaded enough pipe through from the outside and connected it to the outlet. Again using cable ties. I then sealed around the fitting.
Then it was time to get underneath and route the pipe. I used several bits on the body to secure the pipe to, being careful not to put it next to anything to hot or moving! once it was secured, I attached it to the waste tank the same way as the shower one. I then went back and sealed the hole in the wheel arch using sealant and mastic tape. Once these have set, I will try and test to make sure everything goes to the waste tank without any leaks!! EEK!


Sunday 3 July 2016

The Bathroom..

So I haven't really had a lot of time to take pictures or to write the blog, mainly because I've been trying to crack on with doing stuff, so we can get away asap!

I started on the bathroom this weekend but also finished a couple of small jobs off.
Kim helped me sort the edging on the kitchen out by using iron on edging. Which I was really happy with.
First, I test fitted all of the battened walls and also half test fitted the front frame:


I then screwed and glued the second wall into place.
I then made a start cutting the ply for the bathroom walls. I used the battened walls I made as templates. Once I'd cut the ply, everything was varnished and glued and screwed into place.


Next was the front frame.
I had to take the toilet and the shower tray into account because of where the door will be. I also had to leave a hole for the toilet access door (The "Poo door as Kim refers to it).
I put together the frame using simple butt joints again and made sure the door hole was perfectly square.


I made sure it fit into place and screwed it to the walls and floor


It suddenly felt very sturdy after screwing everything, so I was happy with it. I then varnished everything and also added the ply for the front frame.

Today's task was to add the vinyl to the bathroom walls. For this I am using Vinyl flooring. Having been recommended to me, you just stick it on with spray adhesive and it is waterproof enough to handle shower water/steam. So me and Kim cut it all to rough square sizes and then glued it in place one by one. I then went round the edges cutting off the excess. The corners will eventually be seeled with sealant, along with the tops and bottoms. Really happy with the outcome!!


Next was to vinyl the front ply and also fit the "poo" door..


As the weather was so good today, I also managed to do one of the big jobs I had remaining (with the help of my dad as an extra pair of hands).
The waste water tank was built specifically to fit my van and sits underneath, behind the drivers seat.
We just had to fit it! We needed to measure where the tank sat and then fit 4 long hooks into the chassis members. These then had small metal rests that the tank would sit on. The holes were all easy to drill, the hard bit was getting the hooks in! After several minutes swearing and banging, we managed it and tightened the waste tank up to the van: