Starting to move quickly now, at the beginning of the week I bought some cladding battens from wickes. I cut these to fit along side the roof ribs. These will be used to screw the cladding into for the ceiling. The ribs are slightly bent, so I cut some slats in the battens at equal points, so the wood would bend easier. They were then screwed into the ribs with self drilling metal screws:
Once I had all the battens up and screwed into place, I cut more celotex to fit in between. This was then glued to the roof with stixall and held in place by my makeshift wooden props!
I continued along the ceiling until I had reached the front. I then went back and cut a gap where the rooflight will go and also where the spinning vent is. I plan to keep this in and use it as an extractor fan for the kitchen when needed.
I then started insulating the curved sides to join up with the roof celotex. These were a bit of a pain but managed it with a little trick. Basically partly cut the celotex enough to snap it but keeping the aluminium front in one piece. This meant it could go round corners! Most of this stuck on well without much pressure. But a couple of them needed re-enforcing, so again, I made a makeshift prop with some wood!
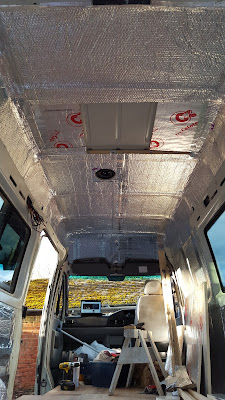
So that's where I got to in the week. All the celotex in, which is a big milestone cause that stuff takes ages. Anyway, I had decided I wanted to create a batter vapour barrier, so this weekend I nipped and got some more double backed foil bubblewrap. I was going to put this everywhere! I started with the ceiling and gluing it as I went along. This was the one time I needed a bit of help, as everything I've done so far has been a one man job. So I drafted my dad in to help me hold the foil as I glued as it was awkward. Anyway, I'm really pleased with how it all turned out, still have a little to do but here it is so far:
As you can see, I've left a gap for the rooflight, so will wait until that's in before I bubblewrap this section. I went round and stuck aluminium tape on all of the joins to seal everything up.
Finished that at about 6pm tonight but wasn't happy with going inside early, so decided to make a start cladding the side door!
I cut the cladding to size by hand and drilled them into the door with self drilling screws. I had to countersink the holes slightly as the screw heads need to pass by the side of the van when the door opens! I am very, very happy with the outcome so far.
I'm going to continue doing this tomorrow night!
Watch this space!


0 comments:
Post a Comment